In this post I'll discuss a small Console helper class I've been using to make it easier and more consistent to use colors with the .NET Console command. While colors are easy enough to access in the Console, to switch colors is a bit of a pain with the plain Console API. The simple class I present here makes it easier to write a line or string in a given color, write a line with multiple colors (using simple [color]text[/color] templating) and an easy way to create a header. The following is a very simple ColorConsole class that provides some useful color helpers:
WriteLine() and Write() methods with Color parametersWriteError(), WriteInfo(), WriteSuccess() and WriteWarning() methods- A color template expansion
WriteEmbeddedColorLine() function - A header generation routine
The Write methods let me quickly write output in a specific color without worrying about setting and resetting the color. The output is written with the specified color and the color is always reset to previously active color.
The high level wrappers like WriteError() and WriteSuccess() provide an alternative the raw Write methods and are more explicit about the intent of the message. It makes colors more consistent with color choices for common situations like error or informational statements.
I often find myself writing Console output that requires multiple more than a single color in a line of text when highlighting values over labels or displaying multiple values of difference importance. I can use multiple Write() statements with colors for this, but to make this easier to read I created a templated method that allows delimiting text with [color]text[/color] delimiters in a string.
ColorConsole.WriteEmbeddedColorLine($"Site Url: [darkcyan]{ServerConfig.GetHttpUrl()}[/darkcyan] [darkgray](binding: {HostUrl})[darkgray]");
Try it out
To use the class looks something like this:
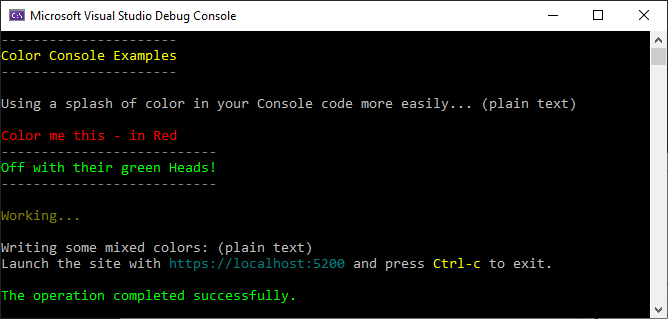
static void Main(string[] args)
{
ColorConsole.WriteWrappedHeader("Color Console Examples");
Console.WriteLine("\nUsing a splash of color in your Console code more easily... (plain text)\n");
ColorConsole.WriteLine("Color me this - in Red", ConsoleColor.Red);
ColorConsole.WriteWrappedHeader("Off with their green Heads!", headerColor: ConsoleColor.Green);
ColorConsole.WriteWarning("\nWorking...\n");
Console.WriteLine("Writing some mixed colors: (plain text)");
ColorConsole.WriteEmbeddedColorLine(
"Launch the site with [darkcyan]https://localhost:5200[/darkcyan] and press [yellow]Ctrl-c[/yellow] to exit.\n");
ColorConsole.WriteSuccess("The operation completed successfully.");
}
which produces the following output:
Code
Here's the ColorConsole class:
public static class ColorConsole
{
public static void WriteLine(string text, ConsoleColor? color = null)
{
if (color.HasValue)
{
var oldColor = System.Console.ForegroundColor;
if (color == oldColor)
Console.WriteLine(text);
else
{
Console.ForegroundColor = color.Value;
Console.WriteLine(text);
Console.ForegroundColor = oldColor;
}
}
else
Console.WriteLine(text);
}
public static void WriteLine(string text, string color)
{
if (string.IsNullOrEmpty(color))
{
WriteLine(text);
return;
}
if (!Enum.TryParse(color, true, out ConsoleColor col))
{
WriteLine(text);
}
else
{
WriteLine(text, col);
}
}
public static void Write(string text, ConsoleColor? color = null)
{
if (color.HasValue)
{
var oldColor = System.Console.ForegroundColor;
if (color == oldColor)
Console.Write(text);
else
{
Console.ForegroundColor = color.Value;
Console.Write(text);
Console.ForegroundColor = oldColor;
}
}
else
Console.Write(text);
}
public static void Write(string text, string color)
{
if (string.IsNullOrEmpty(color))
{
Write(text);
return;
}
if (!ConsoleColor.TryParse(color, true, out ConsoleColor col))
{
Write(text);
}
else
{
Write(text, col);
}
}
#region Wrappers and Templates
public static void WriteWrappedHeader(string headerText,
char wrapperChar = '-',
ConsoleColor headerColor = ConsoleColor.Yellow,
ConsoleColor dashColor = ConsoleColor.DarkGray)
{
if (string.IsNullOrEmpty(headerText))
return;
string line = new string(wrapperChar, headerText.Length);
WriteLine(line,dashColor);
WriteLine(headerText, headerColor);
WriteLine(line,dashColor);
}
private static Lazy<Regex> colorBlockRegEx = new Lazy<Regex>(
()=> new Regex("\\[(?<color>.*?)\\](?<text>[^[]*)\\[/\\k<color>\\]", RegexOptions.IgnoreCase),
isThreadSafe: true);
public static void WriteEmbeddedColorLine(string text, ConsoleColor? baseTextColor = null)
{
if (baseTextColor == null)
baseTextColor = Console.ForegroundColor;
if (string.IsNullOrEmpty(text))
{
WriteLine(string.Empty);
return;
}
int at = text.IndexOf("[");
int at2 = text.IndexOf("]");
if (at == -1 || at2 <= at)
{
WriteLine(text, baseTextColor);
return;
}
while (true)
{
var match = colorBlockRegEx.Value.Match(text);
if (match.Length < 1)
{
Write(text, baseTextColor);
break;
}
Write(text.Substring(0, match.Index), baseTextColor);
string highlightText = match.Groups["text"].Value;
string colorVal = match.Groups["color"].Value;
Write(highlightText, colorVal);
text = text.Substring(match.Index + match.Value.Length);
}
Console.WriteLine();
}
#endregion
#region Success, Error, Info, Warning Wrappers
public static void WriteSuccess(string text)
{
WriteLine(text, ConsoleColor.Green);
}
public static void WriteError(string text)
{
WriteLine(text, ConsoleColor.Red);
}
public static void WriteWarning(string text)
{
WriteLine(text, ConsoleColor.DarkYellow);
}
public static void WriteInfo(string text)
{
WriteLine(text, ConsoleColor.DarkCyan);
}
#endregion
}
Summary
Nothing fancy, and nothing you couldn't come up with in a few minutes yourself, but I find these super helpful and end up using this in just about any Console application now to make it easier to print help screens and provide basic status and progress information. Maybe some of you will find these useful as well...