Monday, 25 July 2022

Switching BPF Stage in a Dynamics 365 Plugin

 When working with Business Process Flows (BPF) you may want to keep the BPF stage aligned with field value(s) when being updated by web request or any other server-side operation. One scenario could be based on a records status reason, you may want to have the BPF stage reflecting that automatically. In this blog I’ll walk through that scenario: switching BPF stage in a Dynamics 365 plugin.

Example:

For example, say we have 3 statuses on the ‘Party’ entity: Proposing, Planning And Live. On the Business Process Flow we also have these three stages (Proposing, Planning And Live).image

In logical order, we grab the active process, get the active stage name and compare to the status code. If the active stage name isn’t equal to the equivalent status code, then we should set the active stage that lines up with the equivalent status code.

The full plugin code is here:


private static Dictionary<int, string> STATUS_CODES = new Dictionary<int, string>() { { 1, "Proposing" }, { 809730000, "Planning" }, { 809730001, "Live" } };
        public void Execute(IServiceProvider serviceProvider)
        {
            ITracingService tracer = (ITracingService)serviceProvider.GetService(typeof(ITracingService)));
            IPluginExecutionContext context = (IPluginExecutionContext)serviceProvider.GetService(typeof(IPluginExecutionContext));
            IOrganizationServiceFactory factory = (IOrganizationServiceFactory)serviceProvider.GetService(typeof(IOrganizationServiceFactory));
            IOrganizationService sdk = factory.CreateOrganizationService(null);

            Entity target = (Entity)context.InputParameters["Target"];

            if (target != null)
            {
                tracer.Trace($"target.id={target.Id}");

                int statusCode = target.GetAttributeValue<OptionSetValue>("statuscode").Value; 

                if (STATUS_CODES.ContainsKey(statusCode))
                {
                    Process(sdk, tracer, target, statusCode);
                }
            }
        }

        private void Process(IOrganizationService sdk, ITracingService tracer, Entity target, int statusCode)
        {
            RetrieveProcessInstancesRequest req = new RetrieveProcessInstancesRequest() { EntityId = target.Id, EntityLogicalName = target.LogicalName };
            RetrieveProcessInstancesResponse response = (RetrieveProcessInstancesResponse)sdk.Execute(req);

            if (response?.Processes != null && response.Processes?.Entities != null && response.Processes.Entities.Count > 0)
            {
                //Retrieve the active stage id
                Guid stageId = response.Processes.Entities[0].GetAttributeValue<Guid>("processstageid");
                string activeStageName = GetActiveStageName(sdk, stageId);
                //find the stage name based off the status code value
                string newStageName = STATUS_CODES[statusCode];
                tracer.Trace($"stageId={stageId}, activeStageName={activeStageName}, newStageName={newStageName}");

                if (!newStageName.Equals(activeStageName, StringComparison.InvariantCultureIgnoreCase))
                {
                    Guid processId = response.Processes.Entities[0].Id;
                    tracer.Trace($"processId={processId}");

                    //get all stages for the BPF
                    RetrieveActivePathResponse pathResp = GetPathResponse(sdk, processId);

                    if (pathResp?.ProcessStages != null && pathResp.ProcessStages?.Entities != null && pathResp.ProcessStages.Entities.Count > 0)
                    {
                        // iterate the stages to find the new EntityReference of the stage you want to set as the active one
                        Entity newStage = pathResp.ProcessStages.Entities.ToList().Where(stage => newStageName.Equals(stage.Get<string>("stagename"), StringComparison.InvariantCultureIgnoreCase)).FirstOrDefault();
                        tracer.Trace($"newStageId={newStage.Id}");

                        if (newStage != null)
                        {
                            Entity update = new Entity("mag_partyprocess", processId); //the business process flow entity
                            update["activestageid"] = newStage.ToEntityReference();
                            sdk.Update(update);
                            tracer.Trace($"Updated bpf with id={processId} with activestageid={newStage.Id}");
                        }
                    }
                }
            }
        }

        private static RetrieveActivePathResponse GetPathResponse(IOrganizationService sdk, Guid processId)
        {
            RetrieveActivePathRequest pathReq = new RetrieveActivePathRequest
            {
                ProcessInstanceId = processId
            };
            RetrieveActivePathResponse pathResp = (RetrieveActivePathResponse)sdk.Execute(pathReq);
            return pathResp;
        }

        private string GetActiveStageName(IOrganizationService sdk, Guid stageId)
        {
            Entity stageEnt = sdk.Retrieve("processstage", stageId, new ColumnSet("stagename"));
            string activeStageName = stageEnt.GetAttributeValue<string>("stagename");
            return activeStageName;
        }


You use the RetrieveProcessInstanceRequest to retrieve the active Business Process Flow, it’s always the first one in the entity collection (I.e response.Processes.Entities[0]). From there you can see the attributes within the active process, the key part here is retrieving the stage name. You can see in the below screenshot you can get the processstageid which allows you to retrieve the stage name to compare with the status reason.

After this part, the code is straight forward, and you simply send an update request to the Business Process Flow entity (in my case mag_partyprocess) to update the stage to the correct one based off the status.

image

Summary

In summary, keeping the Business Process Flow active stage aligned with another field was a bit of a challenge and there weren’t any examples of how to do this online, so I hope this helps you to tackle this issue.

Filter N:N Add Existing Lookup Dynamics 365 V9 Supported Code

 Historically filtering the N:N Add Existing lookup has not been something that we could do in a supported way. It’s been possible to do this using unsupported JavaScript, which originated back in CRM 4.0, and has needed to be rewritten for CRM 2011, CRM 2011 UR12, CRM 2013, and CRM 2016 because of CRM changing the way things work. So pretty much every major release has broken this.

Now that version 9.0 has the ability to show custom lookup objects in a supported way, it’s about time we solved this problem using supported code. By the way, the unsupported CRM 2016 code still works fine with v9… for now.

The idea of making this use supported code is pretty simple. First, replace the existing Add Existing command function with a custom function. Have the custom function launch a lookup window where we have control over the filters etc. Take the selected records and associate them with our record using the Web API (unfortunately there’s no nice “Associate” wrapper in the Xrm.WebApi, so it’s the long way for this).

THE CODE

If you can’t copy the code below, you can also get it from the GitHub project I created to keep this code in a central location:


// Custom function to call instead of the OOTB Add Existing button/command - all 3 parameters can be passed as CRM Parameters from the ribbon

function filterAddExistingContact(selectedEntityTypeName, selectedControl, firstPrimaryItemId) {


        if (selectedControl.getRelationship().name == "account_contact_consultant"  {

            // Custom Account -> Contact N:N - filters to show only contacts with this account as the parentcustomerid

            var options = {

                allowMultiSelect: true,

                defaultEntityType: "contact",

                entityTypes: ["contact"],

                disableMru: true,

                showNew: true,

                searchText: "\n", // Search by default

                filters: [{

                    entityLogicalName: "contact",

                    filterXml: "<filter type='and'> <condition attribute='contacttypemulti' operator='contain-values'> <value>123750001</value> <value>123750002</value></condition> </filter>"

                }]

            };


            lookupAddExistingRecords(selectedControl.getRelationship().name, "account", "contact", firstPrimaryItemId, selectedControl, options);

        }

        else {

            // Any other contact relationship (N:N or 1:N) - use default behaviour

            XrmCore.Commands.AddFromSubGrid.addExistingFromSubGridAssociated(selectedEntityTypeName, selectedControl);

        }


}


// relationshipName = the schema name of the N:N or 1:N relationship

// primaryEntity = the 1 in the 1:N or the first entity in the N:N - for N:N this is the entity which was used to create the N:N (may need to trial and error this)

// relatedEntity = the N in the 1:N or the secondary entity in the N:N

// parentRecordId = the guid of the record this subgrid/related entity is used on

// gridControl = the grid control parameter passed from the ribbon context

// lookupOptions = options for creating the custom lookup with filters: https://docs.microsoft.com/en-us/powerapps/developer/model-driven-apps/clientapi/reference/xrm-utility/lookupobjects

function lookupAddExistingRecords(relationshipName, primaryEntity, relatedEntity, parentRecordId, gridControl, lookupOptions) {

    Xrm.Utility.lookupObjects(lookupOptions).then(function (results) {

        if (results.length > 0) {

            // Get the entitySet name for the primary entity

            Xrm.Utility.getEntityMetadata(primaryEntity).then(function (primaryEntityData) {

                var primaryEntitySetName = primaryEntityData.EntitySetName;


                // Get the entitySet name for the related entity

                Xrm.Utility.getEntityMetadata(relatedEntity).then(function (relatedEntityData) {

                    var relatedEntitySetName = relatedEntityData.EntitySetName;


                    // Call the associate web api for each result (recursive)

                    associateAddExistingResults(relationshipName, primaryEntitySetName, relatedEntitySetName, relatedEntity, parentRecordId.replace("{", "").replace("}", ""), gridControl, results, 0)

                });

            });

        }

    });

}


// Used internally by the above function

function associateAddExistingResults(relationshipName, primaryEntitySetName, relatedEntitySetName, relatedEntity, parentRecordId, gridControl, results, index) {

    var formContext = gridControl.formContext;


    if (index >= results.length) {

        // Refresh the grid once completed

        formContext.ui.setFormNotification("Associated " + index + " record" + (index > 1 ? "s" : ""), "INFO", "associate");

        if (gridControl) { gridControl.refresh(); }


        // Clear the final notification after 2 seconds

        setTimeout(function () {

            formContext.ui.clearFormNotification("associate");

        }, 2000);


        return;

    }


    formContext.ui.setFormNotification("Associating record " + (index + 1) + " of " + results.length, "INFO", "associate");


    var lookupId = results[index].id.replace("{", "").replace("}", "");

    var lookupEntity = results[index].entityType || results[index].typename;


    var primaryId = parentRecordId;

    var relatedId = lookupId;

    if (lookupEntity.toLowerCase() != relatedEntity.toLowerCase()) {

        // If the related entity is different to the lookup entity flip the primary and related id's

        primaryId = lookupId;

        relatedId = parentRecordId;

    }


    var association = { '@odata.id': formContext.context.getClientUrl() + "/api/data/v9.0/" + relatedEntitySetName + "(" + relatedId + ")" };


    var req = new XMLHttpRequest();

    req.open("POST", formContext.context.getClientUrl() + "/api/data/v9.0/" + primaryEntitySetName + "(" + primaryId + ")/" + relationshipName + "/$ref", true);

    req.setRequestHeader("Accept", "application/json");

    req.setRequestHeader("Content-Type", "application/json; charset=utf-8");

    req.setRequestHeader("OData-MaxVersion", "4.0");

    req.setRequestHeader("OData-Version", "4.0");

    req.onreadystatechange = function () {

        if (this.readyState === 4) {

            req.onreadystatechange = null;

            index++;

            if (this.status === 204 || this.status === 1223) {

                // Success

                // Process the next item in the list

                associateAddExistingResults(relationshipName, primaryEntitySetName, relatedEntitySetName, relatedEntity, parentRecordId, gridControl, results, index);

            }

            else {

                // Error

                var error = JSON.parse(this.response).error.message;

                if (error == "A record with matching key values already exists.") {

                    // Process the next item in the list

                    associateAddExistingResults(relationshipName, primaryEntitySetName, relatedEntitySetName, relatedEntity, parentRecordId, gridControl, results, index);

                }

                else {

                    Xrm.Utility.alertDialog(error);

                    formContext.ui.clearFormNotification("associate");

                    if (gridControl) { gridControl.refresh(); }

                }

            }

        }

    };

    req.send(JSON.stringify(association));

}


The first function is an example of how to use this. In this example it’s filtering the contact lookup on a custom N:N between account and contact, which only shows contacts associated to the account via the parent customer. The bottom two functions are generic functions that perform the lookup/associate logic, so they don’t need to change.

HOW TO USE IT

First add the code above into a JavaScript web resource. The first function will need to be tweaked based on your filtering requirements. In my example, the selectedEntityTypeName, selectedControl, and firstPrimaryItemId are CRM parameters passed in from the ribbon context. We’re checking the relationship matches what we’re expecting, then we create the lookup options by specifying the entityTypes, and customFilters (as well as other options defined here: http://butenko.pro/2017/11/22/microsoft-dynamics-365-v9-0-lookupobjects-closer-look).

The primaryEntity and relatedEntity parameters will depend on which side you created the N:N from. Typically the primary will be the one which comes first in the relationship schema name, but if it doesn’t work just switch them around (blame Web API for this).

If we needed to filter N:N’s for other entities, we’d just need to copy this first function and modify it as needed for our other requirements. If we need to filter multiple N:N’s or 1:N’s for the same entity, just add an “else if” on the relationship name check to perform your specific logic.

Once you’ve got the JavaScript sorted, you need to customize the ribbon button (using the ribbon workbench). If you’re filtering a N:N, you need to customize the command for the N:N button (called AddExistingAssoc) on the SubGrid ribbon for your related entity. If you’re filtering a 1:N, you need to customize the command for the AddExistingStandard button.

The code in this blog works the same for both 1:N and N:N, so you can use the same functions for both, and just check the relationship name so you know which is which. Also make sure to use the relationship schema name from the 1:N relationship, not the lookup name.

image

Change the command to use your custom function and library, and then tweak the parameters to pass in the required CRM values. In my case I just needed to add the FirstPrimaryItemId. Also remember to update all the Mscrm display rules/enable rules to “Un-customised = True”.

image

Publish, and that’s it. The rest should just work. I also added a custom notification indicator to show the associate progress, since Web API does the associates asynchronously, if there’s a lot of records being associated it can take a while to complete, so the notification makes the user experience a bit nicer.


Monday, 11 April 2022

Power Platform Tool for Visual Studio 2019

 Power Platform Tool for Visual Studio 2019

We have a new Visual Studio Extension Power Platform Tool.

 Creation and deployment of Plugins, Custom Workflows and WebResources is going to be easy and time saving.

 This article is going to focus on how to connect to your environment and create your Visual Studio Solution. In a subsequent article I will try to cover on how to Create and deploy your components to your environment.

image

Installation is straight forward go to

    Tools→ Manage Extensions→ Search for Power Platform Tools

    You will Need Visual Studio 2019 or later version
    Subsciption to Pawer App/Dataverse or trial 
    .Net Framework 4.6.2

Now we will go over how to create a Project and connect it to your Environment

  1. Open Visual Studio 2019 →New Project

  2. Search for Power Platform Solution Template


image

image
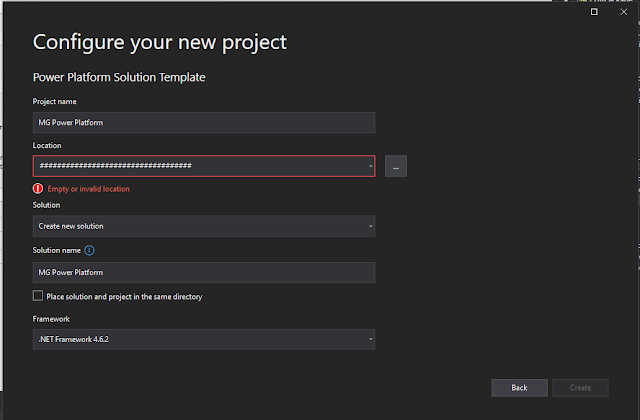
  1. Add Project Name and Location →Create


    image

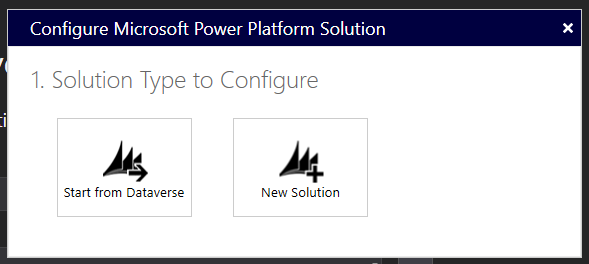
  2. Click on Start from Dataverse to connect to your environment


    image

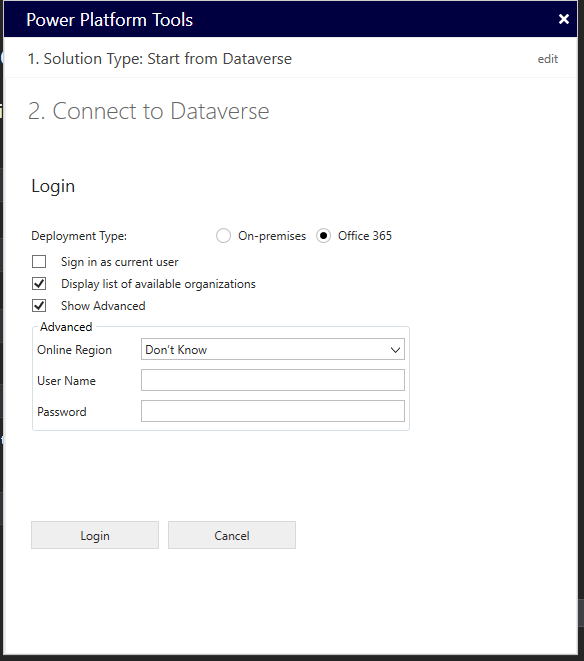
  3. Enter the following and → Login

    1. Online Region

    2. User Name

    3. Password

      image

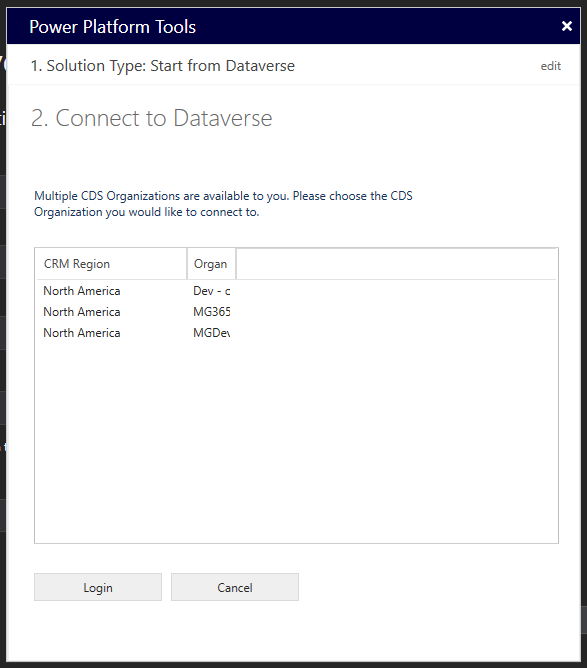
  4. Here is a list of environments available for you select your Dev environment and → Login

  5. Next window will prompt you a confirmation of the environment you are connecting → Next


    image

  6. From the drop down select your solution and → Done

    image

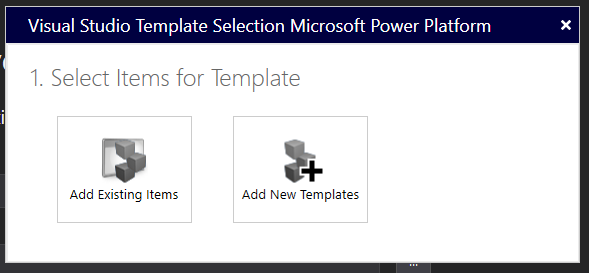
  7. Click Add New Template

    image

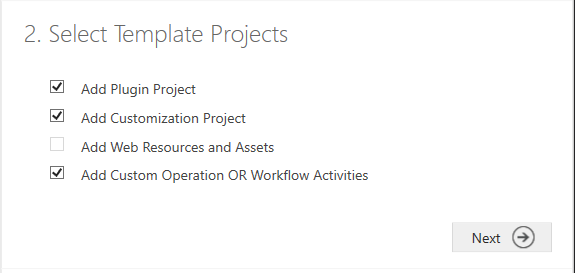
  8. Select Check boxes they names are self explanatory → Next


    image

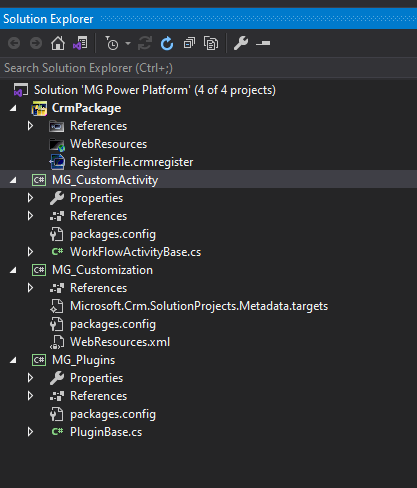
  9. Name your projects → Done

image

Thank you for reading :)

Tuesday, 8 March 2022

Data Export Service Installation and Configuration

 Are you as excited as we are about the Data Export Service (DES) capabilities available when working with Azure with Dynamics 365 for Customer Engagement (D365 CE) Online? In this blog we’ll look at installing and configuring the DES to export data from D365 CE Online to a SQL database. Let’s get started!

Install and Configure Data Export Service

Gather Credentials

  • D365 CE administrator user credentials
  • Azure Portal organization account user credentials
  • Target SQL Database SQL User for use by the Data Export Service

Install Data Export Service

Verify that DES Export is installed on the D365 instance containing the data that you need to export.

  • In D365 CE, check the list of imported solutions at Settings > Solution
  • In D365 CE, navigate to Settings > Data Export
  • Not there? Get it now from https://admin.powerapps.com/

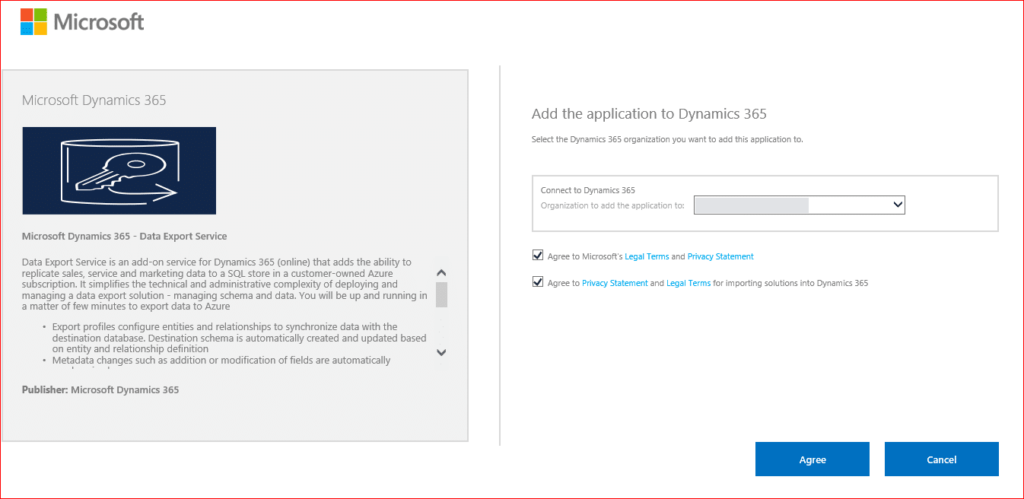
1. Select Get more apps

2. Search for “Data Export Service”

3. Select Get it now

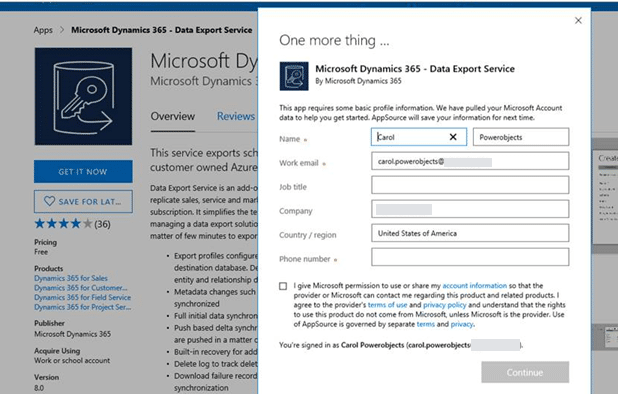
data export service

4. Fill in your information when prompted:

5. Input the name of the organization/instance to add it to and select Agree

Nice work! While that’s running, let’s move on to the Azure portal.

Create/Identify Azure Key Vault & Key

1. Login to the Azure Portal

2. Type “key vault” in the top search box

3. Select Key vaults

4. If this is the first Key Vault, your screen will look similar to this:

5. Select Add > Create key vault:

6. Enter the required information:

7. Click Create

8. Open the key vault

9. Select Keys:

10. Select Generate/Import:

11. Name the new key and click Create.

12. View the newly generated key:

13. Open the new key and select the record shown in the CURRENT VERSION area:

14. Copy the Key Identifier for reference later in this blogpost:

Create a Secret in the Azure Key Vault

If you’re a fan of PowerShell, check out this article: Quickstart: Set and retrieve a secret from Azure Key Vault using PowerShell. Or, follow these steps to work through the Azure GUI.

1. Log into the Azure portal with organization user credentials and navigate to your key vault.

2. Select Generate/Import and enter the information required:

In our example connecting to a SQL database, the secret Value looked something like this:

Depending on what you are connecting to, your solution may require a different Value format than the example shown here. With the multitude of options to choose from, the connection string specifics for each connection type is out of scope for this blogpost. See https://docs.microsoft.com/en-us/azure/key-vault/quick-create-template or search for ‘How To Configure Data Export Service with WhatYouAreConnectingTo’ to help you along your way for a use case other than SQL.

3. Select Create.

4. Open the newly generated secret and select Current Version to view the details.

5. Add a Tag to the secret

  • Enter the D365 CE organizationid as the “Tag Name” (Locate the organizationalid in D365 CE by navigating to Settings > Customizations > Developer Resources.)
  • Enter the TenantID as the “Tag Value” (Locate the Azure Tenant Id while logged into https://www.portal.azure.com by hovering over your name in the top right corner. More information on how to locate your Azure Tenant Id)
  • Save the Tag

6. Copy the secret identifier value for reference later in this blog. In our example the secret identifier value looks something like this:

Register the Data Export Service Application

1. Navigate to Azure Active Directory > App Registrations

2. Locate and select the application Data Export Service for Microsoft Dynamics 365 (If it hasn’t been installed into D365 CE yet, go back and do that now.)

3. Enter a sign-on URL within your organization’s domain

4. Next, open the Data Export Service for Microsoft Dynamics 365 app

5. Go to Settings > Required Permissions > Add

6. Select an API

7. Select Azure Key Vault > Permissions

8. Select Delegated Permissions and Have Full Access

Configure the Access Policy for the D365 Organization in Azure

1. Log into the Azure portal with organization user credentials and navigate to your key vault.

2. Open the Key Vault to create an Access Policy for it. Select Access Policies > Add New

3. Search or select Data Export Service for Microsoft Dynamics 365.

  • Select principal: enter the name or SPN of the DES application b861dbcc-a7ef-4219-a005-0e4de4ea7dcf
  • Key permissions: 0
  • Secret permissions: Get
  • Certificate permissions: 0

Enable Change Tracking on Entities in D365 CE

Ensure that change tracking has been turned on in D365 CE for the entities that will be exported via DES. Keep in mind it must be done manually in each instance, as it does not migrate with solutions.

Tip! Keep the amount of entities with change tracking enabled to a minimum to avoid unnecessary overhead.

1. Inside of the D365 CE Customization area, navigate to the Entity Definition area to select “Change Tracking”

2. Save and Publish the changes

Create the D365 CE Data Export Profile

  • Obtain the Secret Identifier Value for the Secret from the Azure administrator for the Key Vault URL before you begin

1. Log in D365 CE with administrator credentials

2. Navigate to Settings > Data Export. (This is the DES that was installed from step one solution import.)

3. Create a new data profile

4. Enter the parameters requested

Name: ReportingExport (Or, another name that makes sense for your purpose)

Key Vault URL: This is the Secret Identifier Value copied during the steps above or provided by your Azure administrator. It looks something like this:

https://organizationdes-keyvault01.vault.azure.net:443/secrets/OrganizaitonDESDatabaseConnectionString/12345c75935464645555a0d22bcf7369c7a4

(Reminder: Don’t use what you see here. This sample includes an invalid GUID and is solely for reference purposes. You’ll need the value from your Azure tenant.)

Schema: yourdataschemaname

Prefix: yourpreferredprefix

Retry Count: Default 12

Retry Interval (in sec.): Default 5

Write Delete Log: True

5. Select Validate

  • If successful, Click OK > Next

  • If the error “Error validating profile registration” occurs, check out that section below for a suggested resolution.

6. Select the entities to be included/excluded for this profile

7. Select any relationships to be included/excluded for this profile

8. Review the Summary to ensure everything is as you wish

9. Select Create & Activate

10. Click REFRESH.

11. View the status of the profile components

Congratulations! You did it!

Reminders

  • DES must be installed and configured in each instance of D365 in which it is to run.
  • Change tracking will not migrate with solutions.
  • Consider using separate Keys for each specific D365 CE instance.
  • If the secret is generated with credentials other than an organization administrator, you may see the red X with the message Error validating profile registration appearing when you hover over it.

    • This can be easily rectified by logging into Azure with ORGANIZATION account credentials. Then, create the secret.

Hide New... button on lookup controls in model-driven apps

  The 'New ...' button is shown upon opening the lookup search dialog whenever the logged in user has at least user create privileg...